Write the Hiren's BootCD PE ISO file to your USB flash drive. Let's assume that it is on the E: drive and you want to decrease the size of the X: drive within Hiren's BootCD PE to 3 GB (3072 MB).
Before starting Hiren's BootCD PE (within the normal Windows platform), you can launch cmd.exe as an Administrator and run the following commands, customizing them according to your needs:
mkdir C:\hbcd_pe
dism /cleanup-wim
dism /Mount-Wim /WimFile:E:\sources\boot.wim /index:1 /MountDir:C:\hbcd_pe
reg load HKLM\HBCD_PE_HKLM C:\hbcd_pe\Windows\System32\config\SYSTEM
reg add "HKLM\HBCD_PE_HKLM\ControlSet001\Services\FBWF" /v WinPECacheThreshold /t REG_DWORD /d 3072 /f
reg unload HKLM\HBCD_PE_HKLM
dism /Unmount-Wim /MountDir:C:\hbcd_pe /Commit
dism /cleanup-wim
rmdir C:\hbcd_pe
If you are currently using a 64-bit Windows 11 operating system and want your drivers to be recognized within Hiren's BootCD PE, please follow the steps below:
Note: In terms of driver and architecture compatibility, as Hiren's BootCD PE is 64-bit, your current operating system should also be 64-bit. While not always the case, drivers from a 64-bit Windows 10 operating system can often work within the 64-bit Windows 11 PE environment.
1) Insert the USB flash drive with Hiren's BootCD PE into your computer.
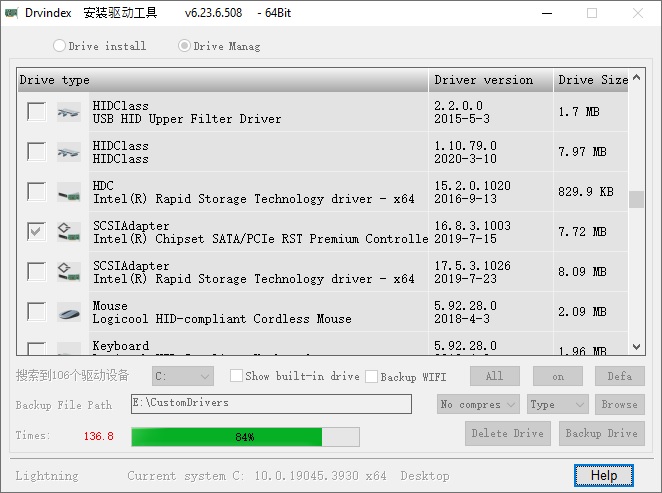
2) Download and run the DrvIndex_x64.exe application as Administrator.
3) Within the application, click on the section labeled "Drive Manag".
4) Check the drivers you want to transfer. Click the "on" button to deselect all drivers, "All" to select all, and "Defa" to choose the ones that were initially selected at the beginning.
5) Click on the section labeled "Topspeed" and make sure to select the "No compres" option. You can leave the adjacent option as "Type".
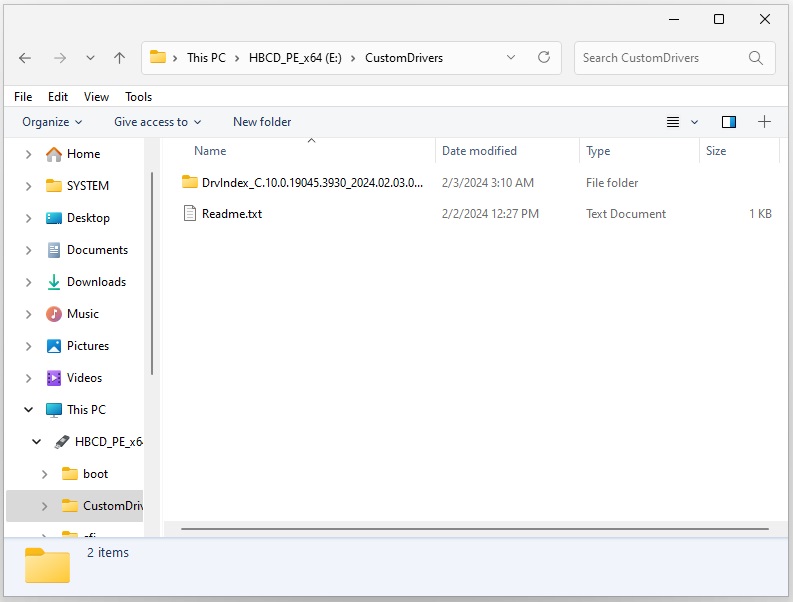
6) Double-click on the folder path next to "Backup File Path" and select the CustomDrivers folder in the root directory of your USB flash drive where Hiren's BootCD PE is located.
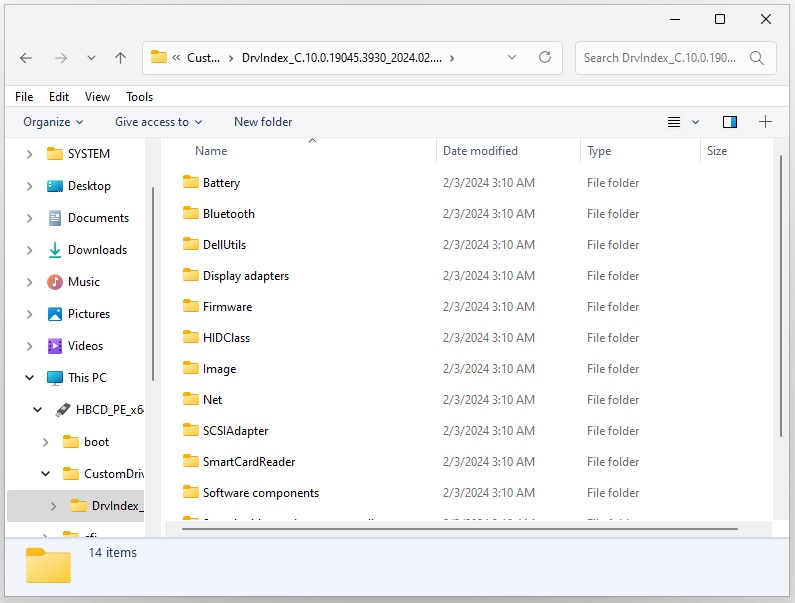
7) Click the "Backup Drive" button at the bottom right to copy the selected drivers into the CustomDrivers folder. The backup process may take some time depending on the write speed of your USB flash drive.
Note: Drivers will start loading in the background after Hiren's BootCD PE has started (desktop opened). Be cautious to only copy the drivers you need and not to copy too many. After Hiren's BootCD PE has started, the driver loading process may take some time.
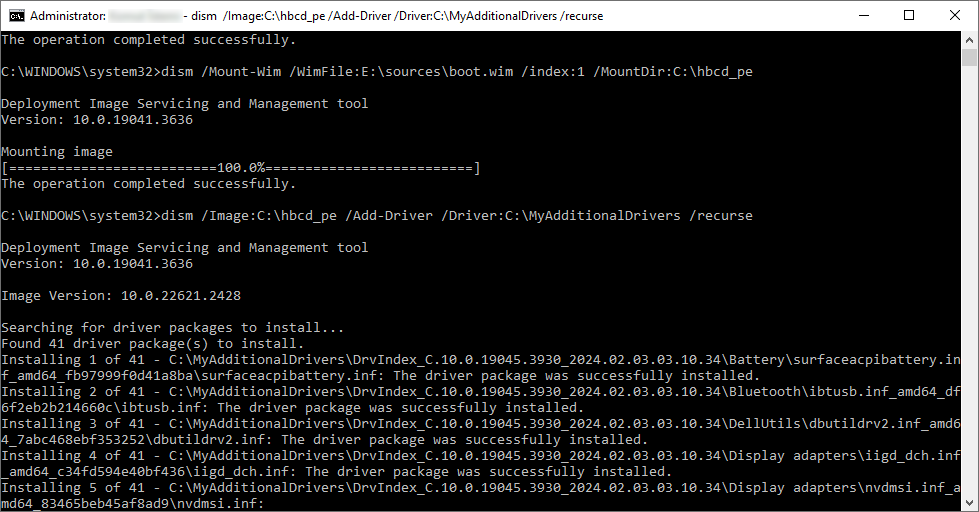
If you wish to integrate your drivers directly into the Hiren's BootCD PE instead of placing them in the CustomDrivers folder within the Hiren's BootCD PE USB flash drive, you can follow the steps below.
1) Connect your Hiren's BootCD PE USB flash drive to your computer. Let's assume that your Hiren's BootCD PE USB flash drive is in the E: drive.
2) Create a folder named MyAdditionalDrivers in for instance C:\ and copy your drivers there without compressing them. You can refer to the steps under the heading "How to add drivers to the CustomDrivers folder?" for guidance.
3) Open the cmd.exe command system in Administrator mode and execute the following commands:
mkdir C:\hbcd_pe
dism /cleanup-wim
dism /Mount-Wim /WimFile:E:\sources\boot.wim /index:1 /MountDir:C:\hbcd_pe
dism /Image:C:\hbcd_pe /Add-Driver /Driver:C:\MyAdditionalDrivers /recurse
dism /Unmount-Wim /MountDir:C:\hbcd_pe /Commit
dism /cleanup-wim
rmdir C:\hbcd_pe
These steps should integrate the drivers into Hiren's BootCD PE.
To add the Windows startup sound to Hiren's BootCD PE, you can modify the ExtPrograms section of the HBCD_PE.ini file found at the root of the USB flash drive as shown below:
_SUB ExtPrograms
    EXEC @!%WinDir%\System32\mpg123.exe -q %SystemRoot%\Media\startup.mp3
_END
If you are encountering the "0xc0000017 - There isn't enough memory available to create a ramdisk device." error on boot, you can try the following steps for a solution:
1) If your RAM capacity is lower than or equal to 2 GB, you should download and use HBCD_PE_x64_v101.iso which has a smaller size. Your RAM capacity appears to be insufficient for the newer versions of HBCD PE.
2) If your RAM capacity is lower than 4 GB but greater than 2 GB, you can try decreasing the size of the HBCD PE Ramdisk (X: drive) to 3 GB (3072 MB) by following the steps outlined in the "How can I change the size of the X: drive?" section.
3) You can try turning off "Legacy Mode" in your BIOS settings.
4) If you cannot disable "Legacy Mode" and you must operate in BIOS mode, your RAM capacity exceeding 4 GB might not be detected. Additionally, your graphics card could be utilizing a portion of the RAM. Disabling Hybrid Graphics (selecting "Discrete Graphics" or "Dedicated Graphics" or experimenting with alternative options) could potentially reduce the amount of shared RAM utilized by the graphics card or eliminate its consumption of shared RAM altogether.
5) Explore alternative solutions listed on the following page: https://www.minitool.com/news/0xc0000017.html
If you desire to manually partition / format my USB Flash drive in a correct way, please follow the steps below:
1) Hit Start, type "command" and you'll see "Command Prompt" listed as the main result. Right-click that result and choose "Run as administrator"
2) Type the following command and press Enter:
diskpart
3) On this step, you should select the correct disk number for your USB flash drive and enter the disk number instead of [Your Disk Number] without the square brackets. For selecting the correct disk number, please pay attention to the disk Size section. Type the following bold commands and press Enter after the command:
Microsoft DiskPart version 6.2.9200
Copyright (C) 1999-2012 Microsoft Corporation.
On computer: KJONES-WIN8
DISKPART> list disk
  Disk ###  Status         Size     Free     Dyn  Gpt
  --------  -------------  -------  -------  ---  ---
  Disk 0    Online          931 GB      0 B        *
  Disk 1    Online           29 GB      0 B
  Disk 2    Online          980 MB      0 B
DISKPART> select disk [Your Disk Number]
Disk [Your Disk Number] is now the selected disk.
DISKPART> clean
DiskPart succeeded in cleaning the disk.
DISKPART> convert mbr
DiskPart successfully converted the selected disk to MBR format.
DISKPART> create partition primary
DiskPart succeeded in creating the specified partition.
DISKPART> select partition 1
Partition 1 is now the selected partition.
DISKPART> active
DiskPart marked the current partition as active.
DISKPART> format quick fs=fat32
  100 percent completed
DiskPart successfully formatted the volume.
DISKPART> assign
DiskPart successfully assigned the drive letter or mount point.
DISKPART> exit
1) First, try the steps mentioned in "How can I manually partition / format my USB Flash drive?" section above.
If it doesn't work, download and open the Rufus application specified on our USB Booting page.
Select your non-functioning USB flash drive within the Rufus application and follow the steps below:
2) In the Rufus application, use the Ctrl+Alt+Z key combination for the "Fast" Zap (zero) operation to write zeros to your entire USB flash drive. This operation does not overwrite blocks that are already zeroed and works quickly. Nevertheless, this process may take some time, so please be patient until it completes.
After the process is finished, remove and reinsert your USB flash drive. Then, attempt to perform a quick format in the appropriate format.
3) If the above step doesn't work, once again in the Rufus application, use the Alt+Z key combination for the Zap (zero) operation to write zeros to your entire USB flash drive. In this operation, unlike the previous step, all blocks are written with zeros regardless of whether they were zeroed before or not. This process may take a considerable amount of time, so please patiently wait until it completes.
After the process is finished, remove and reinsert your USB flash drive. Then, attempt to perform a quick format in the appropriate format.
4) Please also check Rufus can't detect/format my drive and reports that it is read-only or contains no media and Help, Rufus damaged my flash drive! pages.
If you are going to boot from USB, burn the HBCD PE ISO file to your USB drive and then open HBCD_PE.ini file located in the root folder of your USB drive.
Find your Keyboard layout in the file and comment out the command located just below your Keyboard Layout.
For example, if you are using a Russian keyboard, find the lines below:
// Russian
// EXEC !%WinDir%\System32\Wpeutil.exe SetKeyboardLayout 0419:00000419
and change the lines above as below (just remove // at the beginning of EXEC):
// Russian
EXEC !%WinDir%\System32\Wpeutil.exe SetKeyboardLayout 0419:00000419
If you are going to boot from DVD, you can change HBCD_PE.ini file located in the ISO file with an ISO editor and then you can burn the ISO file to a DVD. Alternatively can copy the HBCD_PE.ini file from your DVD root folder to your local drive's root folder (for example to C:\ or D:\ folder). And then make required changes in the HBCD_PE.ini file located in your local drive. Hiren's BootCD PE will search HBCD_PE.ini file in the root folders of the drives with ascending drive letter order. It will process the first found HBCD_PE.ini file.
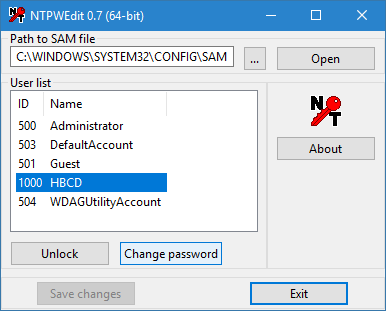
- Boot your computer with Hiren's BootCD PE.
- Goto Start Menu -> Security -> Passwords -> NT Password Edit
- Open your SAM file (It is usually located in C:\Windows\System32\config\SAM).
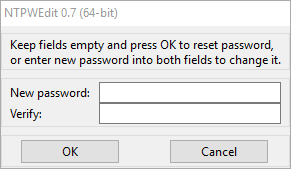
- Click your username and the click 'Change password'. To set a password, type your password both 'New password' and 'Verify' fields and then click to 'OK'. To remove the password, leave both 'New password' and 'Verify' fields blank and then click to 'OK'.
 |
 |